Vintage Wartime Spiced Raisin Cake Recipe
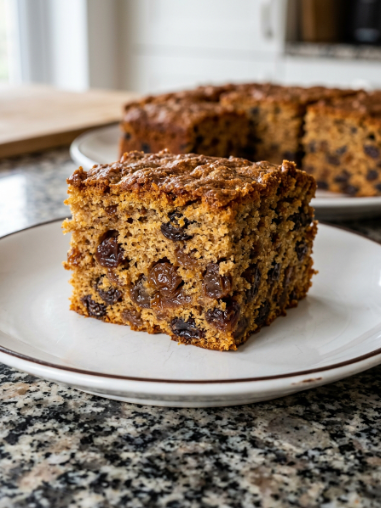
There is something quietly moving about a recipe that carries history within its ingredients. This old-fashioned spiced raisin cake comes from an era when kitchen ingenuity was born of necessity – the 1940s, during World War II, when rationing meant that bakers had to make do with less, yet still found ways to create comforting, flavourful treats for their families. Raisins, spices, and simple pantry staples came together to produce cakes that were economical, warming, and full of character.
This recipe is a celebration of that resourceful spirit. It’s a wonderfully straightforward cake – moist, fragrant with cinnamon, nutmeg, and cloves, and studded with sweet raisins throughout. There’s no butter, no eggs beyond the basics, and no complicated techniques. It’s the kind of cake that fills the kitchen with a cosy aroma and tastes even better the day after it’s baked. Whether you’re a history enthusiast, a lover of vintage baking, or simply looking for a reliable, comforting teatime treat, this spiced raisin cake is well worth making.
Ingredients
- 1 cup (150 g) raisins
- 2 cups (250 g) plain flour
- 1 cup (200 g) granulated sugar
- 1 teaspoon bicarbonate of soda
- ½ teaspoon fine salt
- 1 teaspoon ground cinnamon
- ½ teaspoon ground nutmeg
- ½ teaspoon ground cloves
- ½ cup (120 ml) vegetable oil
- 2 large eggs
- 1 teaspoon vanilla extract
- 1 cup (240 ml) buttermilk
Method
- Preheat the oven: Set your oven to 350°F (175°C). Grease a 9×13-inch (23×33 cm) baking pan or a 9-inch (23 cm) square tin, and line the base with parchment paper if you wish for easy removal.
- Mix the dry ingredients: In a large bowl, whisk together the flour, sugar, bicarbonate of soda, salt, cinnamon, nutmeg, and cloves until evenly combined and free of lumps.
- Combine the wet ingredients: In a separate bowl or jug, whisk together the vegetable oil, eggs, vanilla extract, and buttermilk until smooth.
- Bring the batter together: Gradually pour the wet mixture into the dry ingredients, stirring gently until just combined. Be careful not to overmix – the batter should be smooth but not beaten vigorously.
- Fold in the raisins: Gently fold the raisins into the batter until they are evenly distributed.
- Pour and bake: Pour the batter into your prepared pan and smooth the top with a spatula. Bake for 40–45 minutes, or until the cake is golden brown and a skewer inserted into the centre comes out clean.
- Cool: Allow the cake to cool in the pan for about 10 minutes, then turn it out onto a wire rack to cool completely before slicing.
Expert Tips for Success
- Plump your raisins: For extra-juicy raisins, soak them in warm water (or a little rum, if you like) for 15–20 minutes before folding them into the batter. Drain them well and pat dry with kitchen paper before adding.
- Use freshly ground spices: For the most vibrant flavour, grind your own cinnamon, nutmeg, and cloves if possible. Pre-ground spices are fine, but fresher spices make a noticeable difference.
- Room temperature ingredients: As with most cakes, using eggs and buttermilk at room temperature helps the batter come together more smoothly and yields a lighter crumb.
- Don’t overmix: Overworking the batter can develop gluten and make the cake dense rather than tender. Mix just until the dry ingredients are moistened – a few small lumps are perfectly acceptable.
- Check for doneness: Start testing the cake at the 40-minute mark. A skewer inserted in the centre should come out clean, with perhaps a few moist crumbs attached – but no wet batter.
Variations & Substitutions
- Dried fruit swaps: Replace the raisins with dried cranberries, chopped dried apricots, or currants for a different flavour and texture.
- Spice variations: Experiment with warm spices like cardamom, ground ginger, or allspice in place of or alongside the cinnamon, nutmeg, and cloves.
- Gluten-free: Substitute the plain flour with a good-quality gluten-free flour blend that contains xanthan gum. The texture will be slightly more delicate, but the flavour remains excellent.
- Dairy-free: Replace the buttermilk with almond milk or oat milk mixed with 1 tablespoon of lemon juice or white vinegar – leave it to stand for 5 minutes to curdle before using.
- Nutty addition: Fold in ½ cup (60 g) of chopped walnuts or pecans along with the raisins for added crunch and richness.
Serving Suggestions
- Warm with cream: Serve slices of the cake warm with a dollop of softly whipped cream or a scoop of vanilla ice cream for an extra-indulgent treat.
- With tea or coffee: This cake is a natural partner for a hot cup of tea or coffee – perfect for afternoon tea or a cosy morning break.
- Simple dusting: A light sprinkle of icing sugar over the top adds a touch of elegance without overwhelming the spiced flavours.
- With a glaze: For added sweetness, drizzle a simple icing made from icing sugar and a little milk or lemon juice over the cooled cake.
Storage & Make-Ahead Tips
- Storing: Keep the cake in an airtight container at room temperature for up to 3 days. The flavours actually deepen and improve after a day or two.
- Refrigerating: For longer storage, the cake can be refrigerated for up to a week – just bring it to room temperature before serving for the best texture.
- Freezing: This cake freezes beautifully. Wrap slices or the whole cake tightly in cling film (plastic wrap) and then foil, and freeze for up to 3 months. Thaw overnight in the refrigerator or at room temperature.
This Vintage Wartime Spiced Raisin Cake is more than just a dessert – it’s a small piece of culinary history, a reminder that even in lean times, home bakers found ways to create warmth and comfort through simple, honest ingredients. Its gentle spices, tender crumb, and sweet bursts of raisin make it a timeless treat that deserves a place in any baker’s repertoire. We hope you enjoy making it as much as you’ll enjoy sharing it with those you love.