Classic Lunch Lady Brownies with Frosting
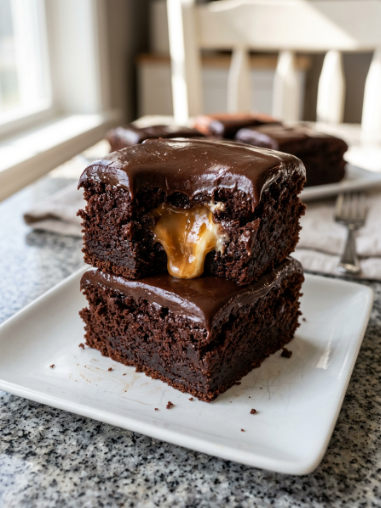
There’s something wonderfully comforting about the smell of chocolate brownies baking in the oven—especially when it brings back memories of school cafeterias and carefree lunchtimes. This classic lunch lady brownies recipe recreates that nostalgic magic at home, delivering a soft, buttery cocoa base topped with a smooth, glossy chocolate frosting. These are the kind of brownies that disappear quickly from the plate, loved by children and adults alike.
What makes these brownies so special is their simplicity. They use basic pantry staples to create a rich, fudgy texture that’s neither too cakey nor too dense—just the perfect chewy middle ground. The frosting is thick, creamy, and utterly decadent, making each bite feel like a treat from a bygone era. Whether you’re baking to relive fond memories or introducing a new generation to this timeless dessert, this recipe is guaranteed to satisfy.
Why You’ll Love This Recipe
This lunch lady brownie recipe is wonderfully straightforward, making it accessible to bakers of all skill levels. The buttery cocoa base comes together quickly with minimal fuss, and the frosting adds a layer of indulgence that elevates these brownies far above anything store-bought. They’re perfect for school bake sales, family gatherings, or simply as a weekend treat.
Unlike commercial brownies, these are made with real, wholesome ingredients—no artificial flavourings or preservatives. The result is a dessert that tastes genuinely homemade, with a depth of chocolate flavour that comes from using good-quality cocoa powder and real butter. Plus, the recipe is easily adaptable, so you can customise it to suit your own taste or dietary needs.
Whether you’re a seasoned baker or just starting out, our step-by-step guide will help you achieve perfectly fudgy, frosted brownies every time. The chewy texture, rich chocolate taste, and creamy topping combine to create a dessert that’s simply irresistible.
Ingredients
For the Brownies:
- All-purpose flour
- Cocoa powder
- Baking powder
- Salt
- Eggs
- Granulated sugar
- Butter
- Vanilla extract
- Optional: chopped nuts
For the Chocolate Frosting:
- Powdered sugar
- Cocoa powder
- Butter
- Milk
- Vanilla extract
- Optional: sprinkles
Feel free to adjust the ingredients to suit your preferences—add your favourite nuts, swap in gluten-free flour, or use dairy-free alternatives as needed.
Step-by-Step Instructions
- Preheat your oven to 350°F (175°C) and grease or line a 9×13-inch baking pan.
- In a medium bowl, sift together the flour, cocoa powder, baking powder, and salt. Set aside.
- In a large mixing bowl, beat the eggs and sugar together until light, pale, and slightly thickened.
- Melt the butter and stir it into the egg mixture, along with the vanilla extract, until well combined.
- Gradually add the dry ingredients to the wet mixture, stirring gently until just combined—do not overmix.
- If using, fold in chopped nuts or other add-ins at this stage.
- Pour the batter into the prepared pan and spread evenly. Bake for 25–30 minutes, or until a toothpick inserted into the centre comes out with a few moist crumbs.
- Allow the brownies to cool completely in the pan on a wire rack.
- For the frosting, whisk together the powdered sugar, cocoa powder, melted butter, milk, and vanilla until smooth and spreadable.
- Spread the frosting evenly over the cooled brownies. Add sprinkles if desired.
- Let the frosting set for about 15–20 minutes before slicing and serving.
Expert Tips for Success
- Use good-quality, unsweetened cocoa powder for the deepest, richest chocolate flavour.
- Ensure eggs and butter are at room temperature for a smoother batter.
- Mix the batter only until the dry ingredients are incorporated—overmixing can lead to tough, dense brownies.
- For a fudgier texture, underbake slightly; the brownies will continue to set as they cool.
Variations and Substitutions
Get creative with mix-ins like chocolate chips, dried cherries, or toasted coconut. For a gluten-free version, simply substitute a 1:1 gluten-free baking flour. Dairy-free butter and milk alternatives work well for those avoiding lactose. You can also experiment with a peppermint or orange extract in the frosting for a festive twist.
Serving Suggestions
These brownies are delicious on their own, but they’re even better served warm with a glass of cold milk, a scoop of vanilla ice cream, or a drizzle of caramel sauce. They make a wonderful dessert for potlucks, picnics, or casual get-togethers. For an extra touch, top each slice with fresh berries or a dusting of powdered sugar.
FAQs
Can I freeze these brownies?
Yes, you can freeze them for up to 3 months. Wrap them tightly in plastic wrap and foil, then thaw at room temperature before serving.
How should I store leftover brownies?
Store in an airtight container at room temperature for up to 3 days, or refrigerate for longer freshness.
Can I use margarine instead of butter?
Butter is recommended for the best flavour and texture, but margarine can be used as a substitute if needed.
Final Thoughts
These classic lunch lady brownies are more than just a dessert—they’re a taste of nostalgia, a reminder of simple joys and shared moments. The tender, fudgy base and silky chocolate frosting come together to create a treat that feels both familiar and special.
Whether you’re baking to relive fond school-day memories or creating new ones with your family, this recipe is a wonderful way to bring a little sweetness into your kitchen. So preheat your oven, gather your ingredients, and enjoy the simple pleasure of homemade brownies done right.